How to Series - Docker sebagai Container app development dan automation
Table of Content
Reference
- installation : https://docs.docker.com/engine/install/ubuntu/
- youtube course : https://www.youtube.com/watch?v=RqTEHSBrYFw & https://github.com/sidpalas/devops-directive-docker-course
Summary
container system seperti docker membuat pengelolaan aplikasi lebih mudah. Hanya berbekal docker compose, aplikasi dapat jalan beserta dependensinya yang telah dibangun di docker image. Layaknya aplikasi portable yang tinggal pakai.
Disini akan membahas:
- installation script
- how to run a docker image
- dockerfile
- docker compose
- self hosted docker registry
- docker swamp
Personal Opinion
Docker benar mengubah dan mempermudah cara pengelolaan server. wajib dipelajari
Prerequisites
- Linux OS atau WSL for windows
How to
Installation
Install di Ubuntu LTS 24+ (ref: Ubuntu | Docker Docs) script ini akan :
- menambahkan Docker ke ubuntu repository
- install docker ce, docker cli dan docker compose
- pasangkan docker ke grup sudo agar tidak perlu jalankan tanpa sudo di setiap perintah
# Add Docker's official GPG key:
sudo apt-get update
sudo apt-get install ca-certificates curl
sudo install -m 0755 -d /etc/apt/keyrings
sudo curl -fsSL [](https://download.docker.com/linux/ubuntu/gpg) -o /etc/apt/keyrings/docker.asc
sudo chmod a+r /etc/apt/keyrings/docker.asc

# Add the repository to Apt sources:
echo \
  "deb [arch=$(dpkg --print-architecture) signed-by=/etc/apt/keyrings/docker.asc] [Index of linux/ubuntu/](https://download.docker.com/linux/ubuntu) \
  $(. /etc/os-release && echo "${UBUNTU_CODENAME:-$VERSION_CODENAME}") stable" | \
  sudo tee /etc/apt/sources.list.d/docker.list > /dev/null
sudo apt-get update

# To install the latest version, run:
sudo apt-get install docker-ce docker-ce-cli containerd.io docker-buildx-plugin docker-compose-plugin

# Verify that the installation is successful by running the `hello-world` image:
sudo docker run hello-world

# Optional, run Docker without root privileges (normally in server/host)
## seharusnya sudah ada grup docker jika install via apt
sudo groupadd docker
sudo usermod -aG docker $USER
## reboot atau jalankan command ini untuk refresh group privileges
newgrp docker
## pastikan bahwa docker bisa menjalankan hello-world tanpa sudo
docker run hello-world
Optional, log rotation agar logs tidak bengkak\
NOTICE: dilakukan setelah instalasi karena tidak langsung ter-apply ke existing container [^1]
# OPTIONAL 2 : Log Rotation agar logs tidak bengkak
$ sudo vi /etc/docker/daemon.json
# lalu isikan json
{
  "log-driver": "json-file",
  "log-opts": {
    "max-size": "10m",
    "max-file": "3",
    "labels": "production_status",
    "env": "os,customer"
  }
}
$ sudo systemctl restart docker
Alternatif referensi instalasi doicker di Ubuntu LTS 24
- https://docs.vultr.com/how-to-install-docker-on-ubuntu-24-04
- https://www.cherryservers.com/blog/install-docker-ubuntu
- https://www.linuxtuto.com/how-to-install-docker-on-ubuntu-24-04/
Podman Desktop
Podman Desktop : Podman Desktop - Containers and Kubernetes | Podman Desktop sebagai alternatif free/open source dari Docker Desktop
flatpak install flathub io.podman_desktop.PodmanDesktopDefinition
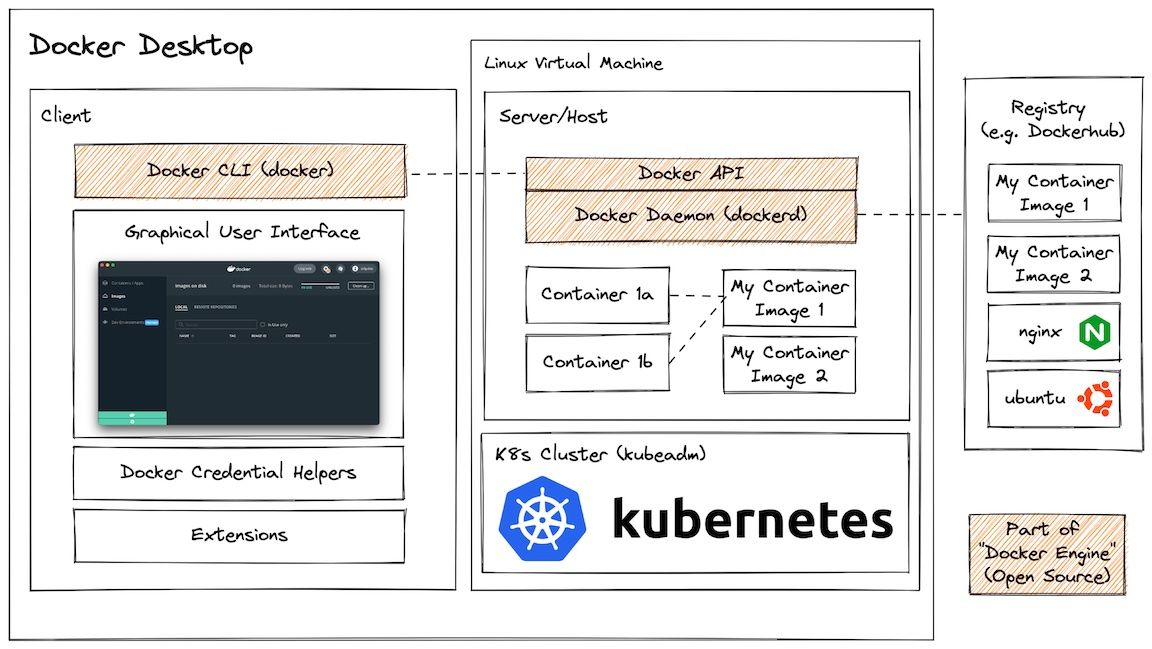
Docker Engine, terdiri dari Docker CLI (Docker) di client, Docker API & Docker Daemon (dockerd) di server.
Docker Desktop, terdiri dari Docker CLI (Docker), GUI, Credential helpers, extensions, Virtual Machine untuk Docker Daemon + Docker API, serta Kubernetes Cluster (Optional).
Run a Docker Image
Example: Run Docker Image dan auto remove the container after exit argument
--rmakan autoremove container tersebut setelah digunakan
# Create a container from the ubuntu image
docker run --interactive --tty --rm [](ubuntu:22.04)

# Try to ping google.com
ping google.com -c 1 # This results in `bash: ping: command not found`

# Install ping
apt update
apt install iputils-ping --yes

ping google.com -c 1 # This time it succeeds!
exit
Example: Run Docker Image, and reused it later tanpa
--rmcontainer tetap akan berjalan-itadalah shortcut untuk--interactive --tty
# Create a container from the ubuntu image (with a name and WITHOUT the --rm flag)
docker run -it --name my-ubuntu-container [](ubuntu:22.04)

# Install & use ping
apt update
apt install iputils-ping --yes
ping google.com -c 1
exit

# List all containers
docker container ps -a | grep my-ubuntu-container
docker container inspect my-ubuntu-container

# Restart the container and attach to running shell
docker start my-ubuntu-container
docker attach my-ubuntu-container

# Test ping
ping google.com -c 1 # It should now succeed! 🎉
exit
Run Docker from Dockerfile
# Build a container image with ubuntu image as base and ping installed
docker build --tag my-ubuntu-image -<<EOF
FROM [](ubuntu:22.04)
RUN apt update && apt install iputils-ping --yes
EOF

# Run a container based on that image
docker run -it --rm my-ubuntu-image

# Confirm that ping was pre-installed
ping google.com -c 1 # Success! 🥳
Volume & Bind
Volume digunakan ketika ingin menggunakan volume yang didefinisikan (bernama) dan dapat digunakan oleh container lain. Lokasi path volume ditentukan oleh docker, dan terkadang sulit dicari di 'host'
Mount & Bind digunakan jika ingin mengakses, mengirimkan, atau modifikasi langsung folder yang ada di host. Perubahan yang dilakukan di container, akan langsung terlihat di host.
We can use VOLUMES and mounts to safely persist the data.
# create a named volume
docker volume create my-volume

# Create a container and mount the volume into the container filesystem
docker run  -it --rm --mount source=my-volume,destination=/my-data/ [](ubuntu:22.04)
# There is a similar (but shorter) syntax using -v which accomplishes the same
docker run  -it --rm -v [](my-volume:/my-data) [](ubuntu:22.04)

# Now we can create and store the file into the location we mounted the volume
echo "Hello from the container!" > /my-data/hello.txt
cat my-data/hello.txt
exit
We can now create a new container and mount the existing volume to confirm the file persisted:
# Create a new container and mount the volume into the container filesystem
docker run  -it --rm -v [](my-volume:/my-data) [](ubuntu:22.04)
cat my-data/hello.txt # This time it succeeds!
exit
OR, we can use BIND to bind directory directly
# Create a container that mounts a directory from the host filesystem into the container
docker run  -it --rm --mount type=bind,source="${PWD}"/my-data,destination=/my-data [](ubuntu:22.04)
# Again, there is a similar (but shorter) syntax using -v which accomplishes the same
docker run  -it --rm -v ${PWD}/[](my-data:/my-data) [](ubuntu:22.04)

echo "Hello from the container!" > /my-data/hello.txt

# You should also be able to see the hello.txt file on your host system
cat my-data/hello.txt
exit
TIPS : CHECK ALL REAL VOLUMES
# Create a container from an image that can access the Docker Linux VM
# Pinning to the image hash ensures it is this SPECIFIC image and not an updated one helps minimize the potential of a supply chain attack
$ docker run -it --rm --privileged --pid=host justincormack/nsenter1@[](sha256:5af0be5e42ebd55eea2c593e4622f810065c3f45bb805eaacf43f08f3d06ffd8)

# Navigate to the volume inside the VM at:
$ ls /var/lib/docker/volumes/my-volume/_data
$ cat /var/lib/docker/volumes/my-volume/_data/hello.txt # Woohoo! we found our data!
Network
Secara default, docker menggunkan driver bernama bridge agar dapat berkomunikasi antar container di dalam docker. Driver lainnya: host untuk menggunakan default host network, none agar terisolated sendiri.
Contoh membuat network custom dengan basis bridge agar hanya beberapa container yang bisa saling berkomunikasi
# create a new network based on `bridge` driver with the name `my-net`
docker network create -d bridge my-net

# run dokcer using the custom network
docker run --network=my-net -itd --name=container3 busybox
docker run --network=my-net -itd --name=container4 busybox
Dockerfile
Baris per baris Dockerfile dihitung, karena mempengaruhi urutan hasil docker image dan ukuran image hasil.
Setiap baris akan menyimpan "state" dari hasil image. Setiap baris akan menambah ukuran image. Jika salah satu baris diganti, maka proses build minimal dari baris tersebut akan diulang, tapi baris sebelumnya tidak berubah sehingga waktu build jauh lebih ringkas.
ref: https://docs.docker.com/reference/dockerfile/
Example
Contoh Dockerfilke
# Filename: Dockerfile

FROM [](php:8.4-fpm)

RUN apt-get update && apt-get install -y  \
    libfreetype6-dev \
    libjpeg-dev \
    libpng-dev \
    libwebp-dev \
    libmagickwand-dev \
    --no-install-recommends \
    && docker-php-ext-configure gd --with-freetype --with-jpeg \
    && pecl install imagick \
    && docker-php-ext-enable imagick \
    && docker-php-ext-install pdo_mysql gd mbstring

# Get latest Composer
RUN curl -sS [](https://getcomposer.org/installer) | php -- --install-dir=/usr/local/bin --filename=composer

# copy source code
WORKDIR /app
COPY . /app
RUN composer install

CMD php artisan serve --host=0.0.0.0 --port=8181
EXPOSE 8181
Untuk ignore file yang boleh dicopy dari working directory, bisa menggunkaan .dockerignore https://docs.docker.com/build/concepts/context/#dockerignore-files
# .dockerignore
node_modules
README.md
NOTES.md
kemudian, jalankan via docker build .
Common Syntax
Common Syntax antara lain :https://docs.docker.com/reference/dockerfile/
# memanggil dari image lain, contohnya *-alpine yang ukurannya kecil
FROM [image]

# Menjalankan command
RUN [command]

# Pindah ke working directory, baris berikutnya untuk RUN, CMD, ENTRYPOINT, ADD dan COPY akan dimulai dari sini
WORKDIR [directory]

# Copy file atau recursively dari directory
COPY [src] [dest]

# Command special, sebagai command terakhir sebagai default program yang akan jalan setelah container di run. Hanya boleh 1x dipanggil dalam Dockerfile
CMD [command]

# Expose port
EXPOSE [port]
Multi Stage
Ukuran Build bisa diringkas / diperkecil dengan memanfaatkan multi stage via multiple FROM di dalam satu Dockerfile. Contoh, dibawah ini hasil build image hanya akan menyisakan hasil binary dari FROM kedua dari image scratch.
# syntax=docker/dockerfile:1
FROM [](golang:1.24) AS build
WORKDIR /src
COPY <<EOF /src/main.go
package main
import "fmt"
func main() {
fmt.Println("hello, world")
}
EOF
RUN go build -o /bin/hello ./main.go
FROM scratch
COPY /bin/hello /bin/hello
CMD ["/bin/hello"]Docker Compose
Docker Compose sebagai alternatif dari Dockerfile, mempermudah konfigurasi via YML. Biasanya Docker Compose digunakan untuk mempermudah menjalankan hasil build dari Dockerfile via YML Configuration, karena tinggal mengganti parameter konfigurasi.
Contoh :
# filename a.Dockerfile
FROM alpine
RUN /bin/sh -c apk add --update --no-cache openssl
# filename b.Dockerfile
FROM base_image
# `base_image` doesn't resolve to an actual image. This is used to point to a named additional context
# build service b# filename docker-compose.yml
services:
a:
build:
dockerfile: a.Dockerfile
# built image will be tagged <project_name>_a
b:
build:
dockerfile: b.Dockerfile
additional_contexts:
# `FROM base_image` will be resolved as a dependency on service "a" which has to be built first
base_image: "service:a"Kemudian, bisa dijalankan via docker compose up atau docker compose up -d untuk dijalankan di background proses. Kemudian, docker compose down untuk mematikan.
Docker Registry
https://www.freecodecamp.org/news/how-to-self-host-a-container-registry/
Docker Swarm
https://docs.docker.com/engine/swarm/
-
Create manager di host 1
docker swarm init --advertise-addr <MANAGER-IP>contoh hasil,
$ docker swarm init --advertise-addr 192.168.99.100
Swarm initialized: current node (dxn1zf6l61qsb1josjja83ngz) is now a manager.

To add a worker to this swarm, run the following command:

    docker swarm join \
    --token SWMTKN-1-49nj1cmql0jkz5s954yi3oex3nedyz0fb0xx14ie39trti4wxv-8vxv8rssmk743ojnwacrr2e7c \
    192.168.99.100:2377

To add a manager to this swarm, run 'docker swarm join-token manager' and follow the instructions.-
Join node baru ke manager host
docker swarm join --token [token] [manager ip]contoh,
 $ docker swarm join \
  --token  SWMTKN-1-49nj1cmql0jkz5s954yi3oex3nedyz0fb0xx14ie39trti4wxv-8vxv8rssmk743ojnwacrr2e7c \
  192.168.99.100:2377

This node joined a swarm as a worker.-
Deploy a server dengan replica via swarm di Manager node
docker service create --replicas [n] --name [name] [container]contoh,
# create a service dengan `1` replica bernama `helloword` dari `alpine` container, dengan command `ping docker.com`
$ docker service create --replicas 1 --name helloworld alpine ping docker.com

# lihat daftar service yang aktif
$ docker service ls

# inspect servicer
$ docker service inspect --pretty helloworld
$ docker service ps helloworld
- Ganti total replica
docker service scale <SERVICE-ID>=<NUMBER-OF-TASKS> - Delete service
docker service rm [service-id] - Apply rolling updates
docker service update --image [newimage] [service]docker service update --image [](redis:7.4.1) redis - Drain a node,
docker node update --availability drain [worker]maka node tersebut akan diproses shutdown dari semua service yang berjalan. Akan tetapi, total replica akan tetap sama karena task baru akan dibangun di node ynag 'available', termasuk node yang sudah digunakan saat itu (bisa multiple replica di dalam 1 node).
Other Reading
- Cheatsheet : Docker
- docker laravel multiple : Running multiple Laravel apps locally with Docker
- docker laravel traefik : Manage multiple sites with Docker Compose and Traefik
- LEMP Stack Tools
- DDEV : DDEV (mostly recommend)
- Devilbox : GitHub - devilbox-community/devilbox: A modern Docker LE(A)MP stack and MEAN stack for local development. (pernah coba dan menarik, tapi kurang di maintain akhirnya pindah tangan )
- Lando : Documentation | Lando 3
- Laradock : Use Docker First - Learn About It Later! Laradock | Laradock
Footnote
[^1]: menghindari file logs bengkak: https://docs.docker.com/engine/install/linux-postinstall/#configure-default-logging-driver